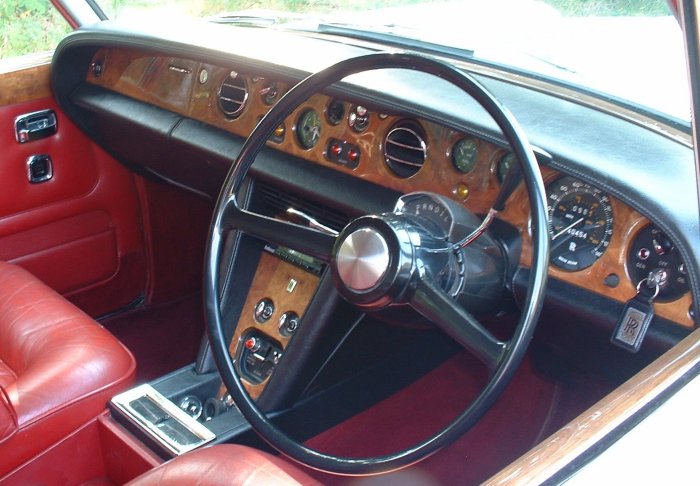
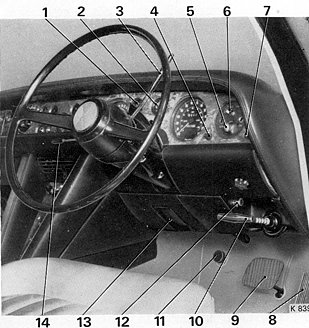
The dashboard above is of my 1969 Rolls-Royce Silver Shadow SRH6839. This dashboard has the next lay-out:
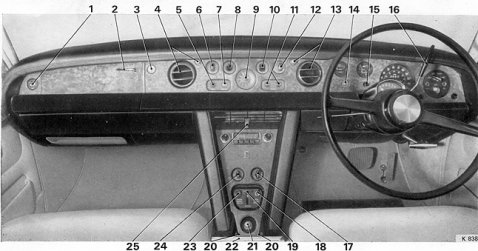
This scheme has been copied from the original handbook of the Rolls-Royce Silver Shadow and Bentley T from chassisnumber 6001 (1969). The digits in this scheme have the next meanings:
- Map lamp switch. This lamp is situated in the ceiling, just above the B-style.
- Cubby box handle.
- Cubby box lock. In my car that is the same lock number as the ignition lock and the door locks.
- Adjustable outlet and control for fresh or cold air. The grid is spherical and can unlimited be adjusted by hand in all directions. The bars can be turned vertically or in any other position. The pull switch on the right above the opening is the switch to effect the airstream.
- Fuel level warning lamp. When it is burning the colour is green.
- Instruments lamps switch. This is a rotary knob with three positions: out, poor light, strong light. On the first position you can hardly see that any light is burning. In the second position the light intensity is somewhat better, but to my opnion not convincing.
- Coolant level warning lamp.
- Loudspeaker balance control. This switch is not regulating the balance between two speakers on the left and on the right, but speakers in front and in rear.
- Adjustment knob for clock hands. This is a turning knob that first has to be depressed.
- Aerial switch. The aerial is positioned on the right car wing, some decimetres away from the windscreen. The aerial rises as long as the switch is kept above.
- Accumulator warning lamps. They both are red coloured. The one warns for a bad accumulator, the other for a malfunctioning brake- and heightcontrol system.
- Windscreen wiper/washer switch. The wiper has two speeds. Turn the switch once to the right and the wipers sweep on normal speed. Once again to the right and they sweep quicker. There is no interval. The screen washer is activated by pushing the switch. When the washer has not been used for a long time it can last some time before the water reaches the screen.
- Like 4: adjustable outlet and control for fresh or cold air.
- Hand brake and stop lamp bulb failure warning lamp. The colour is orange. The lamp burns when the hand brake is used and when the bulbs fail when braking.
- Fuel / oil level indicator and warning lamps test switch. This is a pushing switch. When you push this button the pointer for the fuel level (the instrument directly above number 14) is not indicating the fuel level anymore, but the oil level of the engine. When you push this button before starting the engine, but with contact on, all warning lamps are tested.
- Gear range selector lever. The selection is pointed out in a small window on the steering column.
- Lower heating and ventilation switch. This switch is a turning switch with five positions. It can also be pulled in four positions. For an explanation of the heating system, have a look at the technical part of this website (in Dutch).
- Rear window demister switch. This is a rocker switch.
- Blower motor switch. This switch can be moved downwards (and upwards again) in five positions.
- Front seat switches. These switches are hard to see on the picture above, for they are positioned to the left and right wall of the box. The switch can be moved in eight directions: upwards, downwards, forewards, backwards and all positions between these directions.
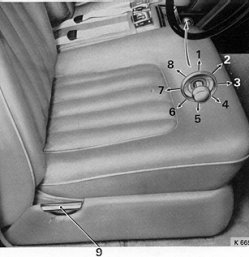
The back rests are only adjustable by hand (nr 9.) by pulling the handle upwards and pushing the back rest backwards or letting come the back rest forewards on resilience.
- Cigar lighter. Both the rear doors have their own cigar lighters.
- Ashtray. The ashtray is situated in the horizontal part of the centre console.
- Hazard warning switch. The lamp is also the switch and can be pulled. In 1970 this was modified into a pushing switch.
- Upper heating, ventilation and refrigeration switch. The switch has a vertical position, four positions to the left and four to the right. When turning to the right of the centre position the airconditioning starts to work. The switch can also be pulled in four positions, like switch 17.
- Airconditioning outlet. The sleeve valve in the middle can be moved upwards and downwards for closing and opening the heating.
|
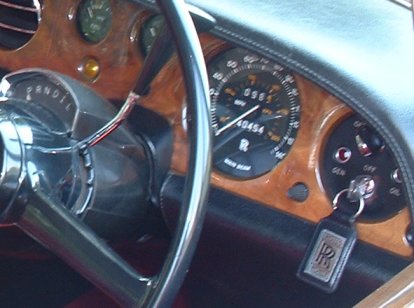
- Fuel gauge. Also oil level gauge when pushing button 15 in the scheme above.
- Coolant temperature indicator.
- Gear range selector lever. See number 16 in the scheme above.
- Speedometer trip release. Turning knob to put the trip counter to 0.
- Ignition switch. For starting turn to the right. When turning to the left the "generator"-position is activated. In that key-position the engine and all instruments for driving are not working (such as the height control).
- Main lighting switch. When turning once to the right the clearance and side lights are burning. When turning once again the dipped beam is burning. See for the main beam number 11. The switch can also be pulled. In that case the cabin lighting on the ceiling on the drivers side is burning.
- Fuel filler door switch. Pushing switch.
- Accelerator pedal. Under the accelerator pedal the pushing switch is located for the kick-down.
- Foot brake pedal.
- Hand brake handle. The handle can be pulled. To release it it first has to be turned to the right and then be pulled.
- Headlamp dipping switch.
- Fuse box cover retaining screw.
- Bonnet lock control.
- Direction indicator switch.
|
In the schemes you can see the next features, but they are not numbered.
- Upper scheme on the left, below the cubby box: glove box.
- Upper scheme directly below air conditioning outlet 25: standard the Silver Shadow was provided with a radio.
- The signal horn is the silver button in the centre of the wheel.
- Some 10 centimeter above the hand grip of the hand brake (scheme below number 10) a turning switch is located. When turning to the left the left parking light will burn, when turning to the right, the right parking light will burn.
|
In the interior there are some features that can not be seen on the schemes. But it is good to list them on this page as well.
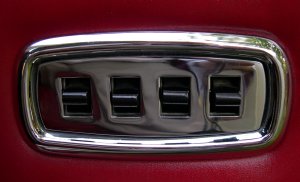
- On the right front door (RHD) four switches are located for actuating the four electric windows. All other doors have just one switch for only actuating that window. In later cars a switch is added for shutting all windows in a time with one switch. And a switch for preventing children to open the rear windows.
- Both the C-styles are provided with vanity-mirrors. Besides those mirrors there are switches that can be moved upwards and downwards. To one side the lamp above the mirror is lighted, to the other side the lamps above both the mirrors will burn together.
|
|
 Marinus Rijkers. Disclaimer
